Performance Testing Framework with Gatling and Maven
What is the best way to organize and structure a Gatling project for performance testing?
When designing a framework, we should think about maintainability and extendability, thus how we organize the components is very important.
In this tutorial, we will show how to create a performance testing framework from scratch using Gatling and maven.
Gatling Maven Test Framework
Pre-requisites:
For this tutorial you need to have the following installed:
- Java 1.8
- Maven 3.5
- IntelliJ with Scala Plugin installed
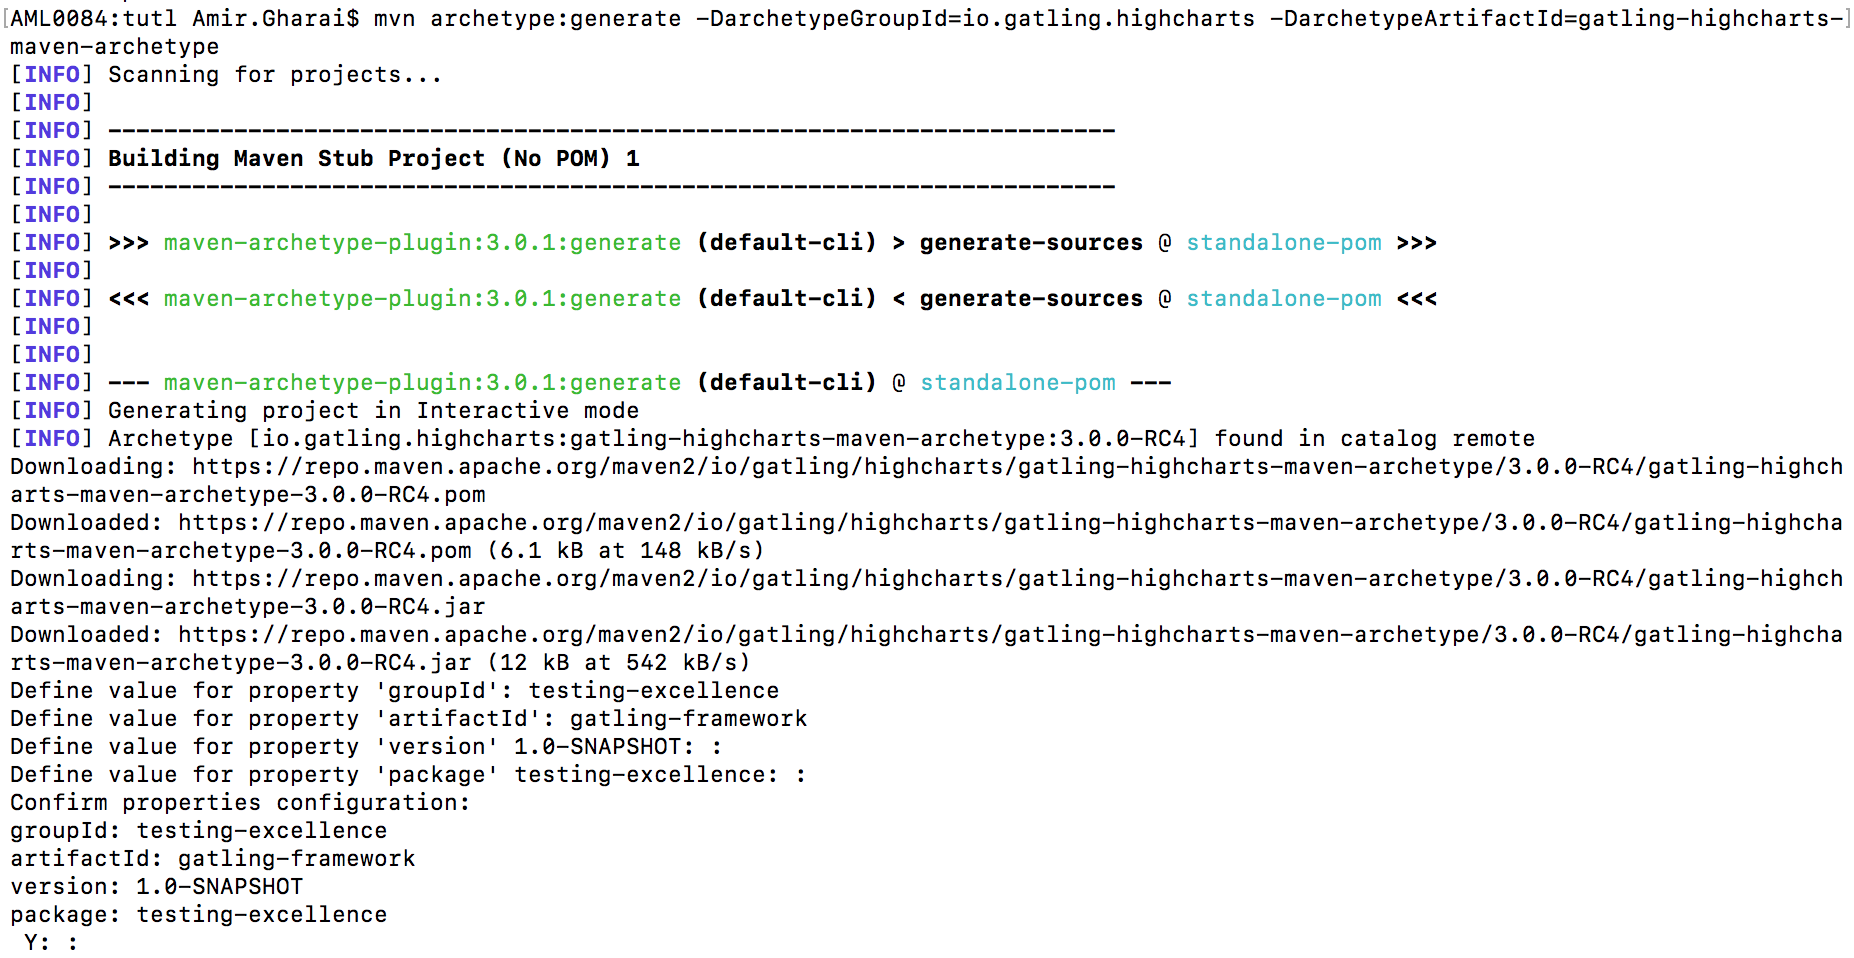
First, we create a base project by running the maven Gatling archetype:
mvn archetype:generate -DarchetypeGroupId=io.gatling.highcharts -DarchetypeArtifactId=gatling-highcharts-maven-archetype
When you execute the above command, it will start downloading the dependencies.
When prompted, provide values for ‘groupId’, ‘artifactId’, and ‘version’.
My setup looks like the following:
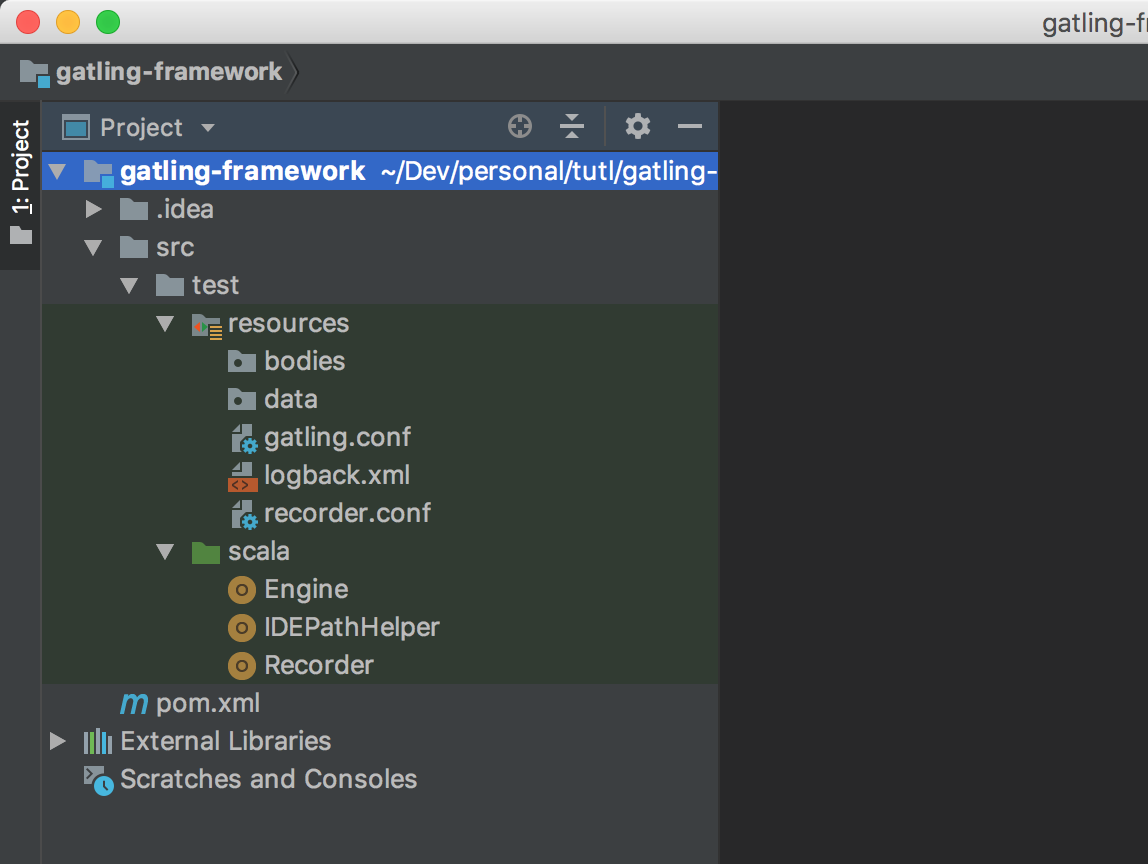
When you open the project, you will notice there are some default files and folders.
Under the resources, we have
bodies this package holds the request payloads. For example, you can have requests templates for various requests.
data this package holds the data you need to feed to your tests, such as CSVs.
In addition to the above two folders, there are Gatling.conf, logback.xml and recorder.conf files. We won’t be discussing these in this tutorial.
The Gatling maven archetype also creates three base Scala object, but we won’t be using them, so go ahead and delete the objects.
In addition, we will create four packages, config, requests, scenarios, and simulations:
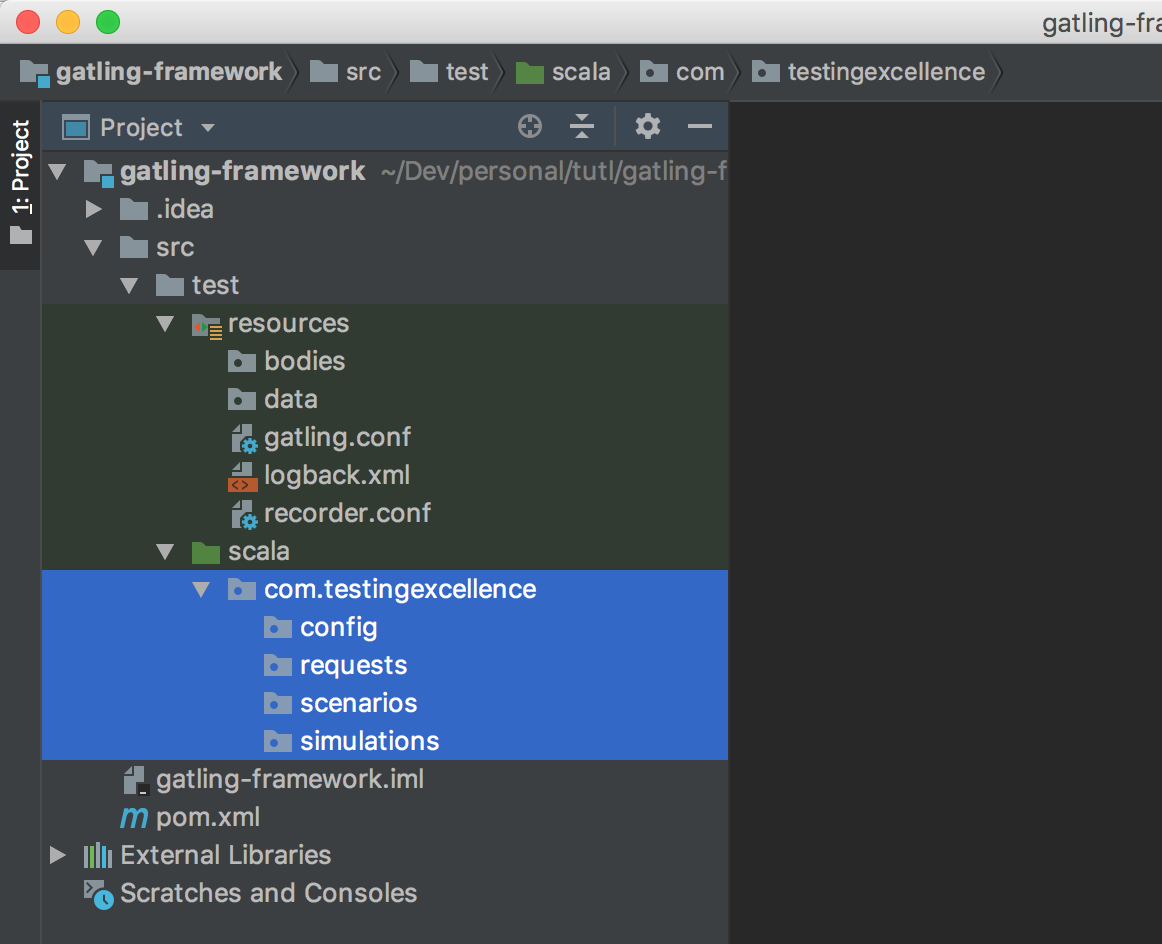
Config Package
In the config package, create a Scala object called Config. This will hold various configurations for our project such as application URLs, default users, etc…
package io.devqa.config

object Config {
    val app_url = "http://example-app.com"

    val users = Integer.getInteger("users", 10).toInt
    val rampUp = Integer.getInteger("rampup", 1).toInt
    val throughput = Integer.getInteger("throughput", 100).toInt
}
Requests Package
The requests package holds different operation requests. For example, we could have a request that gets an authorization token. Another request can use the token from the previous request to create a user and so on.
These are individual and isolated requests sent to different endpoints.
GetTokenRequest
package io.devqa.requests

import io.gatling.core.Predef._
import io.gatling.http.Predef._
import io.devqa.config.Config.app_url

object GetTokenRequest {
    val get_token = http("RequestName").get(app_url + "/token")
    .check(status is 200)
    .check(jsonPath("$..token").saveAs("token"))
}
CreateUserRequest
package io.devqa.requests

import io.devqa.config.Config.app_url
import io.gatling.core.Predef._
import io.gatling.http.Predef._

object CreateUserRequest {

    val sentHeaders = Map("Authorization" -> "bearer ${token}")

    val create_user = exec(http("Create User Request")
    .post(app_url + "/users")
    .headers(sentHeaders)
    .formParam("name", "John")
    .formParam("password", "John5P4ss")
    .check(status is 201)
    .check(regex("Created").exists))
}
Scenarios Package
The scenario package holds the business scenarios. For example, to create a user, we first have to get an auth token and then send the token as a header along with form parameters to create a user. i.e. we use the response of the first request to feed to the second request. This “chaining of requests” is quite common in API testing.
CreateUserScenario
package io.devqa.scenarios

import io.devqa.requests.{CreateUserRequest, GetTokenRequest}
import io.gatling.core.Predef.scenario

object CreateUserScenario {
    val createUserScenario = scenario("Create User Scenario")
    .exec(GetTokenRequest.get_token)
    .exec(CreateUserRequest.create_user)
}
Simulations Package
Finally, we have the Simulations in the simulations package. You can think of simulations as different load profiles. For example, we can have a normal load simulation or a spike simulation.
The simulations need to be Scala classes and they must extend the Gatling Simulation class.
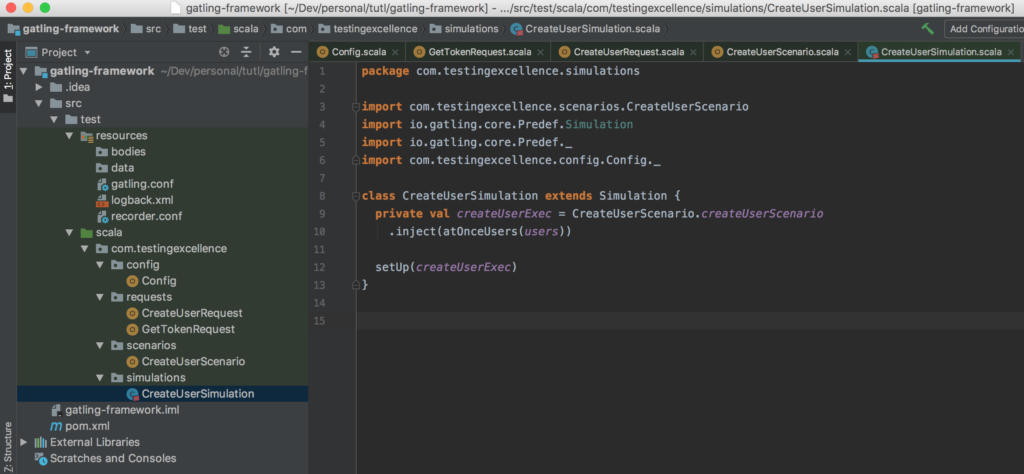
package io.devqa.simulations

import io.devqa.scenarios.CreateUserScenario
import io.gatling.core.Predef.Simulation
import io.gatling.core.Predef._
import io.devqa.config.Config._

class CreateUserSimulation extends Simulation {
    private val createUserExec = CreateUserScenario.createUserScenario
    .inject(atOnceUsers(users))

    setUp(createUserExec)
}
Your project should look like the following:
We also need to modify our pom.xml file to be able to pass parameters, such as users and throughput to our performance tests at runtime.
pom.xml file
The pom.xml file should look like:
<?xml version="1.0" encoding="UTF-8"?>
<project xmlns="http://maven.apache.org/POM/4.0.0" xmlns:xsi="http://www.w3.org/2001/XMLSchema-instance"
            xsi:schemaLocation="http://maven.apache.org/POM/4.0.0 http://maven.apache.org/xsd/maven-4.0.0.xsd">
    <modelVersion>4.0.0</modelVersion>
    <groupId>testing-excellence</groupId>
    <artifactId>gatling-framework</artifactId>
    <version>1.0-SNAPSHOT</version>
    <properties>
    <maven.compiler.source>1.8</maven.compiler.source>
    <maven.compiler.target>1.8</maven.compiler.target>
    <encoding>UTF-8</encoding>
    <gatling.version>2.3.0</gatling.version>
    <gatling-plugin.version>2.2.4</gatling-plugin.version>
    <typesafe-config.version>1.3.2</typesafe-config.version>
    <simulation>CreateUserSimulation</simulation>
    </properties>
    <dependencies>
    <dependency>
        <groupId>io.gatling.highcharts</groupId>
        <artifactId>gatling-charts-highcharts</artifactId>
        <version>${gatling.version}</version>
        <scope>test</scope>
    </dependency>
    <dependency>
        <groupId>com.typesafe</groupId>
        <artifactId>config</artifactId>
        <version>${typesafe-config.version}</version>
    </dependency>
    </dependencies>
    <build>
    <plugins>
        <plugin>
        <groupId>io.gatling</groupId>
        <artifactId>gatling-maven-plugin</artifactId>
        <version>${gatling-plugin.version}</version>
        <configuration>
            <simulationClass>io.devqa.simulations.${simulation}</simulationClass>
            <jvmArgs>
            <jvmArg>-Denv=${env}</jvmArg>
            <jvmArg>-Dusers=${users}</jvmArg>
            <jvmArg>-Drampup=${rampup}</jvmArg>
            <jvmArg>-Dduration=${duration}</jvmArg>
            <jvmArg>-Dthroughput=${throughput}</jvmArg>
            </jvmArgs>
            <propagateSystemProperties>true</propagateSystemProperties>
        </configuration>
        </plugin>
    </plugins>
    </build>
</project>
Finally, to execute the simulation class, we run the following command
mvn clean gatling:execute -Dusers=1
The above command will run the CreateUserSimulation with 1 user.